Most coordination problems aren’t software issues-they’re information problems. If the underlying geometry is off, every clash test and shop drawing inherits the error. The fix is a rigorous point cloud to BIM workflow that starts with 3D laser scanning, locks in control points and coordinate systems, and converts the registered cloud into a lean, accurate model. We’ll cover how to set LOD/LOI by trade, where to accept measured intent vs. modelling every imperfection, and how to verify results with cloud-to-model deviation checks. The outcome: Scan to BIM deliverables that reduce rework, de-risk installs, and give superintendents and foremen a model they’ll actually use in the field.
Why convert point clouds to BIM?
Renovations, brownfield upgrades, and fit-outs live or die on measured truth. A disciplined Scan to BIM process gives you one geometric reality for architecture, structure, and MEPF, reducing rework and RFIs. For a clear primer on this end-to-end approach (from scanning through modelling and coordination), see Revolutionizing Construction: The Power Of Scan To BIM Services-it’s a practical overview many teams share with owners early in preconstruction.
Define scope, tolerances, and deliverables (before anyone scans)
Start with intent, not software:
- Use cases: design development, trade coordination, prefabrication, or FM handover.
- LOD/LOI: specify what to model and how much data to include (e.g., LOD 300 for coordination, 350 for shop-adjacent scopes). If you need a refresher on the levels, align your spec with Levels Of Development (LOD) In BIM: A Comprehensive Guide.
- Accuracy targets: registration RMS, slab elevation tolerances, steel alignment (e.g., ±6 mm arch, ±3–6 mm steel).
- Coordinates: survey control and how it maps to the Revit Project Base Point/Survey Point.
- Deliverables: RVT, IFC, NWC/NWD, deviation reports, and asset registers.
Step 1 – Plan the 3D laser scanning campaign
- Control & targets: establish control (total station/GNSS) and place spheres/checkerboards as needed.
- Coverage & density: station spacing to achieve point spacing goals (e.g., 3–6 mm at 10 m for steel).
- Occlusions & safety: plan supplemental scans in congested ceilings and risers; coordinate off-hours for live facilities.
- Naming & metadata: consistent scan IDs, notes, and photo logs pay off downstream.
For a capture-to-model walkthrough (cleaning, segmentation, best-fit modelling), teams often reference Unveiling The Potential Of Point Cloud To BIM Services.
Step 2 – Capture the site
Mix methods to fit constraints:
- Tripod TLS for accuracy indoors/plant rooms.
- Mobile SLAM to accelerate long corridors and large interiors.
- Photogrammetry/UAV for roofs and facades.
Overscan decision-critical zones-steel connections, equipment pads, vertical risers-where tolerances are tight.
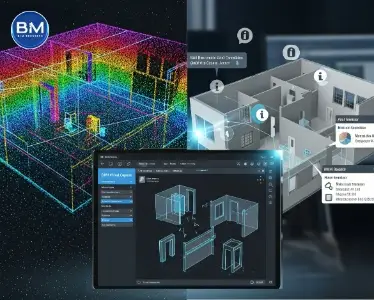
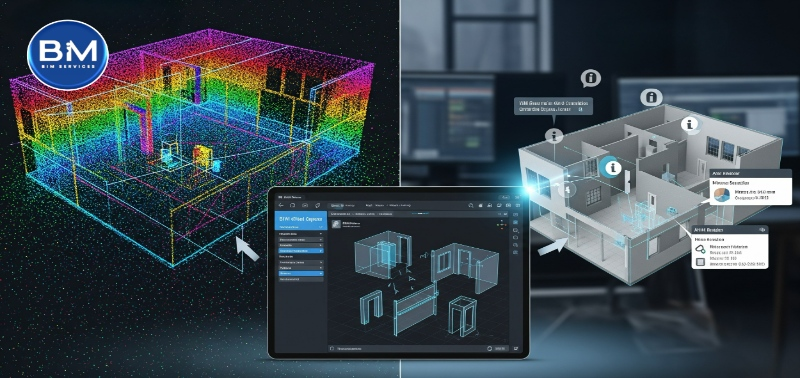
Step 3 – Register and clean the point cloud
- Registration: target-based, cloud-to-cloud (ICP), or hybrid, anchored to control. Always publish an RMS report.
- Cleaning & clipping: remove passersby/noise; clip by level/zone; decimate judiciously.
- Color & segmentation: keep RGB when it supports material ID or asset labeling.
- Formats: RCP/RCS for Autodesk, E57/LAS for interoperability.
Step 4 – Seed your BIM correctly
- Coordinates: align the Survey Point to control; lock the Project Base Point; test links.
- Levels & grids: derive from slices and verify against control.
- Template: shared parameters (asset IDs, spec refs), naming standards, deviation filters.
- Worksets: keep clouds on their own workset; partition model by zone/discipline.
If your organization is shifting from 2D, the practical implications are outlined in Architectural BIM Services Vs Traditional CAD Design. It explains why this upfront setup pays off during coordination and submittals.
Step 5 – Model the architectural envelope
- Use thin sections (50–100 mm) to trace walls and partitions; choose core centerline vs finish based on intent.
- Fit floors, roofs, and stairs; record slopes/camber when they affect drainage or facade datum.
- Model openings and glazing with parametric families; log out-of-square frames as deviations rather than over-modelling.
Step 6 – Model structure to measured intent
- Columns & beams: best-fit centerlines; document camber/tilt outside tolerance.
- Decks & joists: keep repetitive logic; perfect edge conditions for facade/MEP clearance.
- Connections: only model plates/angles that affect clashes or fabrication; store the rest as metadata.
Tradeoff: modelling every warp slows teams without adding decision value. Capture the delta as data unless it impacts install risk.
Step 7 – Model the MEPF systems that actually get installed
- Equipment: AHUs, chillers, switchgear, panels, pumps-use manufacturer-accurate families.
- Primary routing: model mains, risers, trunks, and headers; allow small branches to remain context if scope permits.
- Clearances: add maintainability zones and code clearances (NEC/IMC) as solids.
- Parameters: system names, sizes, materials, asset IDs to support coordination and O&M.
For coordination payoffs and trade workflows, share Exploring The World Of BIM Modeling Software (A Comprehensive Guide) with your PMs-it frames how authoring and coordination tools fit together.
Step 8 – QA/QC with deviation analysis
- Spot checks: perpendicular sections; cloud-to-model distances via heat maps or point-to-surface checks.
- Acceptance: compare to Step-0 tolerances; tag exceptions.
- Huddles: short weekly reviews resolve ambiguous geometry before it spreads.
If you need to translate tolerances into element detail expectations, align your checks with Levels Of Development (LOD) In BIM: A Comprehensive Guide. BIM Services
Step 9 – Coordinate and publish
- Clash detection: federate arch/struc/MEPF plus clipped clouds; sequence clash sets (steel vs mains first).
- Issues & CDE: keep priorities and due dates in a shared environment.
- Deliverables: RVT/IFC/NWC, annotated as-built drawings, and deviation summaries.
Handover documentation often raises misunderstandings. Point stakeholders to Unveiling The Contrast: Shop Drawings Vs As-Built Drawings In Construction to clarify expectations before you publish.
Step 10 – Handover and sustain
- FM metadata: asset IDs, warranty dates, PM intervals; link O&M PDFs.
- Rescans: for phased renovations, rescan high-change zones (post-demo, pre-cover) and publish delta models.
- Archive: store control files, registration reports, and clipped clouds for future scopes.
New stakeholders who need the big picture can skim What Is Building Information Modeling (BIM)? to see how point clouds feed downstream construction and operations.
The tradeoffs you must balance
- Fidelity vs performance – dense clouds and hyper-detailed families feel great until views crawl; clip by level/zone and model what adds decision value.
- Automation vs craftsmanship – auto-recognition excels on straight runs/repetitive members; humans win on irregular historic fabric and tricky transitions.
- Reality vs idealization – model to measure intent; carry warps as deviation data unless they affect installation.
- Tolerances vs cost – tighter specs raise scan time and modelling hours; tie them to downstream needs (steel fab vs schematic design).
- Single-sensor vs multi-sensor – TLS + SLAM + photogrammetry can fill gaps but increases registration complexity; mix only when it solves a real problem.
Quick kickoff checklist
- ✅ Use cases, LOD/LOI, coordinate strategy, and deliverables documented
- ✅ Scan plan (density, occlusions, safety, naming) agreed
- ✅ Registered cloud with RMS report, clipped by zone
- ✅ Revit template (parameters, view templates, worksets) ready
- ✅ Envelope, structure, primary MEPF modelled to scope
- ✅ Deviation checks complete; exceptions tagged
- ✅ Federated model coordinated; issues tracked and closed
- ✅ Handover (RVT/IFC/NWC, sheets, COBie/O&M) issued